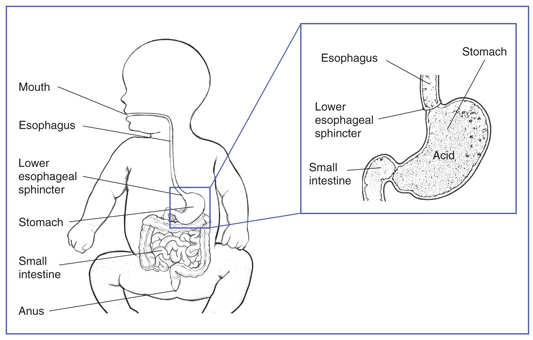
One problem that impacts a large number of young children in Gastroesophageal Reflux Disorder (GERD). Statistically, babies who have GERD are at risk for feeding issues during childhood. It is important that parents be given tools to recognize GERD, address GERD, and promote future eating habits.
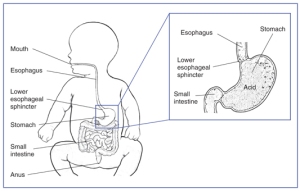
When the lower esophageal sphincter has poor closure, stomach content can regurgitate back up into the esophagus.
The best indicator of GERD is the infant’s symptoms, which may include reoccurring vomiting, fussiness during feedings, inconsistency with intake of milk or formula volume, gagging, swallowing with effort, arching the back or refusing to eat despite appearing hungry. Many caregivers of children with GERD report that they have been feeding baby while they are sleeping, since baby is refusing feedings while awake. Medical tests cannot rule out GERD.
As an occupational therapist, my expertise is education on positioning, during and after feedings:
- Use the log roll technique while changing babies diaper or clothes. Many caregivers lie babies on their back and lift their bottom by their legs in order to change diapers or clothing. This position puts a great deal of pressure of baby’s stomach and promotes stomach contents to reflux into baby’s esophagus. Instead, roll baby from side to side like a “log”. Avoid twisting baby’s trunk by keeping shoulders and hips aligned.
- Feed baby on their side with head up above feet, versus flat on their back. Place a pillow under your shoulder, ensuring that baby is on their side and with an upright incline.
- For babies 6 months or older, feed baby on their left side. Stomachs are positioned on your left side. Infants have a vertical stomach, with very little curvature. If your baby is 6 months or older (around the time most babies learn to sit upright), their stomach is beginning to be compressed into the shape of a kidney bean. Due to the position of the stomach, many babies who are 6 months are older, will reflux less when feed lying on their left side. If your baby is breast feed, you can use the football hold technique in order to nurse from the left breast and keep baby on their left side.
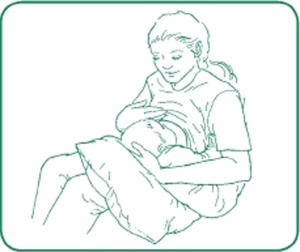
The “football hold” is a great breastfeeding position to nurse from the left breast and positioning baby on his left side.
- After baby eats, keep baby upright or on their tummy for 20 minutes. My personal favorite was using a baby carrier after feedings.
Caregiver’s should also be aware of common feeding patterns of infants or children with GERD. The symptoms of GERD can cause children to cycle back and forth from being in pain and refusing food, and being very hungry and overeating. After regurgitating stomach content up into the esophagus, the area becomes inflamed, irritated and painful, and many children will avoid eating. Then, after sometime, the physical, painful symptoms subside and the child is again ready to eat. Since the child has been avoiding food, they are very hungry. At this stage, many children will overeat and overfill their stomach. This causes the stomach content to regurgitate again, which cycles back to avoiding food again.
If a caregiver suspects that a child has GERD, they should track the child’s feeding time (time of day and duration) or bottle intake. Look for patterns of poor feedings and overeating. The caregiver should also track the time of any observable symptoms, and look for patterns of discomfort after feedings with a larger volume.
In order to prevent this cycle, caregivers should consult with the child’s pediatrician to discuss strategies to prevent overeating. The plan needs to be specialized for that child.
Finally, it is important to discuss strategies for promoting future healthy eating habits. It is understandable that a child would be at risk for eating problems when their first experience with food is pain and discomfort. While baby is nursing or bottle feeding, the caregiver should be aware of their own body language and tone of voice. Are your shoulders tight? Is your voice strained? Take a deep breath. Sing a sweet song to baby. Coo and giggle with them. Your calmness will carry them through a difficult time.
As the caregiver introduces solids (which is less likely to regurgitate because of their thicker texture), they should make a point to emphasize the joy of eating. Play with food! Get messy, squeeze, paint, draw, lick, splat, make “animals”, make car noises, and most importantly SMILE while eating together. Little ones are designed to learn and change. Together, caregivers and children can build new, fun experiences with food.


.jpg")